Showing posts with label Blogger Tutorial. Show all posts
Showing posts with label Blogger Tutorial. Show all posts
How to Make 125x125 Ad Box Blog
How to Make 4 Box Ad Size 125x125 - Well now I am going to share a tutorial "How to Make 125x125 Ad Box Blog'' yes someone asks me how to make the ad box. Refer to the following tutorial ..
 1. Login to Blogger
2. Dashboard >> Layout >> Add Gadgets
3. Choose HTML/Javascript
4. Enter this code in the HTML/Javascript
2. Dashboard >> Layout >> Add Gadgets
3. Choose HTML/Javascript
4. Enter this code in the HTML/Javascript
<style type='text/css'>
.kotak-iklan { background : #ddd; text-align : center; border-radius : 4px; padding : 12px 0; }
.kotak-iklan img { background : #ebf5f9; margin : auto; padding : 5px; text-align : center; width : 125px; height : 125px; }
.kotak-iklan img:hover { background : #fff; }
</style>
<div class="kotak-iklan">
<a href="Link here" title="Leet Blogger"><img alt="Ad banner" src="https://blogger.googleusercontent.com/img/b/R29vZ2xl/AVvXsEienQkYBfu33PfwnTUk_3n-omuY2vzaSqtFXIrdAiaH0L9n9S2QzhHBfwvGV3CevMgDEpysipPX3V7ZC4AE-8l-PfLU4y_L4p4nLXG4iVpWWlz5izoLXQimuTNS5J6flyjd7a-88bLPMu4/h120/125x125ad.jpg"/></a>
<a href="Link here" title="Leet Blogger"><img alt="Ad banner" src="https://blogger.googleusercontent.com/img/b/R29vZ2xl/AVvXsEienQkYBfu33PfwnTUk_3n-omuY2vzaSqtFXIrdAiaH0L9n9S2QzhHBfwvGV3CevMgDEpysipPX3V7ZC4AE-8l-PfLU4y_L4p4nLXG4iVpWWlz5izoLXQimuTNS5J6flyjd7a-88bLPMu4/h120/125x125ad.jpg"/></a>
<a href="Link here" title="Leet Blogger"><img alt="Ad banner" src="https://blogger.googleusercontent.com/img/b/R29vZ2xl/AVvXsEienQkYBfu33PfwnTUk_3n-omuY2vzaSqtFXIrdAiaH0L9n9S2QzhHBfwvGV3CevMgDEpysipPX3V7ZC4AE-8l-PfLU4y_L4p4nLXG4iVpWWlz5izoLXQimuTNS5J6flyjd7a-88bLPMu4/h120/125x125ad.jpg"/></a>
<a href="Link here" title="Leet Blogger"><img alt="Ad banner" src="https://blogger.googleusercontent.com/img/b/R29vZ2xl/AVvXsEienQkYBfu33PfwnTUk_3n-omuY2vzaSqtFXIrdAiaH0L9n9S2QzhHBfwvGV3CevMgDEpysipPX3V7ZC4AE-8l-PfLU4y_L4p4nLXG4iVpWWlz5izoLXQimuTNS5J6flyjd7a-88bLPMu4/h120/125x125ad.jpg"/></a>
</div>
NOTE : Change the Text Color Red by advertising links and image links
Change Text colored blue with the ad description.
5. Click Save ...: D
Do not forget to Like and share this tutorial..
Share Under Everypost and Ads Feature Optimized
Share Underpost With Full Box and Ads Feature Optimized - Welcome to my blog leetblogger.com. Either because there is no work or anything, I fill vacation time with blogging activities. Okay here we go. This time I will give you a fresh tutorial. Namely how to create a box that contains a full share, email subscribe and and Ads Optimazation.

Features:
Share on FacebookShare on Twitter
Share on Google+
More Share ✚ (All Socail Networks)
Email Subscribe
Ads with Size 350x250
Share Under Everypost and Ads Feature Optimized
First of all, put the following code above ]]></b:skin> or </style>.box-underpost{width:100%;height:auto;padding:0;margin:0 auto;position:relative;font-size:14px;background:#eee;}
.box-left{width:50%;height:250px;padding:0;float:left;background:#fff;}
.box-right{width:50%;height:250px;padding:0;float:right;text-align: center;}
.title-share{margin:0 0 1px;font-size:18px;font-family: Oswald;color:#333;text-transform:uppercase;display:block;background:#aaa;padding-left:30px;height:40px;line-height:40px}
.fb{display:block;margin:0 0 1px;background:#ccc;padding:0;position:relative;height:34px;line-height:34px}
.fb-on,.tw-on,.gp-on,.more-shareon{position:absolute;top:0;left:0;background:#ccc;z-index:2;display:block;width:100%;padding:0;text-align:left;color:#555;transition:all 400ms ease-in-out;height:34px;line-height:34px}
.print-boxon{position:absolute;top:0;left:0;background:#ccc;z-index:2;display:block;width:100%;padding:0;text-align:left;color:#555;transition:all 400ms ease-in-out;height:34px;line-height:34px}
.fb-on span, .tw-on span,.gp-on span,.more-shareon span,.email-title span,.print-boxon span{margin-left:30px;}
.fb:hover .fb-on,.tw:hover .tw-on,.gp:hover .gp-on,.more-share:hover .more-shareon,.submit-email:hover .email-title,.print-box:hover .print-boxon{display:none;}
.tw,.gp{display:block;margin:0 0 1px;background:#ccc;padding:0;position:relative;height:34px;line-height:34px}
.more-share{display:block;margin:0 0 1px;background:#ccc;padding:0;position:relative;height:34px;line-height:34px}
a.more{background:#007eff;border:1px solid #0b6bce;border-radius:2px;font-size:16px;font-weight:700;color:#fff;text-align:center;padding:0px 6px;text-decoration:none;margin-left:30px}
.submit-email{text-align:left;margin:0 0 1px;background:#ccc;padding:0;position:relative;height:34px;line-height:34px}
.submitbutton {background: #FF8000;border: none;font: 12px Oswald;color: #fff;height: 25px;padding:0 12px;top: 5px;right:8px;text-transform:uppercase;cursor: pointer;position:absolute;}
.enteryouremail {background: #fff !important;border:none;padding: 0px 70px 0 7px;color: #a19999;font-size: 12px;height: 25px;width: 60%;margin-left:30px;}
.enteryouremail:focus{outline:none}
.email-title{text-decoration:none;position:absolute;top:0;left:0;background:#ccc;z-index:2;display:block;width:100%;padding:0;text-align:left;color:#555;transition:all 400ms ease-in-out;height:34px;line-height:34px}
Then put the following code under the code <data:post.body/>
<b:if cond='data:blog.pageType == "item"'>
<div class='box-underpost'>
<div class='box-left'>
<div class='title-share'>Share this article :</div>
<div class='fb'>
<div class='fb-on'><span>Share on Facebook</span></div>
<div style='position:absolute;top:-7px;left:30px'>
<div class='fb-like' data-action='like' data-layout='button_count' data-share='false' data-show-faces='false' data-width='90'/></div>
</div>
<div class='tw'>
<div class='tw-on'><span>Share on Twitter</span></div>
<div style='position:absolute;top:5px;left:30px'>
<a class='twitter-share-button' data-count='horizontal' data-related='' data-via='' expr:data-text='data:post.title' expr:data-url='data:post.url' href='http://twitter.com/share' title='Share via Twitter'>Tweet</a>
<script async='async' src='http://platform.twitter.com/widgets.js' type='text/javascript'/></div>
</div>
<div class='gp'>
<div class='gp-on'><span>Share on Google+</span></div>
<div style='position:absolute;top:5px;left:30px'>
<div class='g-plusone' data-count='true' data-size='medium' expr:data-href='data:post.url' rel='nofollow'/></div>
</div>
<div class='more-share'>
<div class='more-shareon'><span>More Share</span></div>
<a class='a2a_dd more' href='http://www.addtoany.com/share_save' title='More Share'>✚</a>
<script async='async' src='http://static.addtoany.com/menu/page.js' type='text/javascript'/>
</div>
<div class='submit-email'>
<div class='email-title'><span>Subscribe Here</span></div>
<form action='http://feedburner.google.com/fb/a/mailverify' method='post' onsubmit='window.open('http://feedburner.google.com/fb/a/mailverify?uri=leetbloggers', 'popupwindow', 'scrollbars=yes,width=550,height=520');return true' target='popupwindow'>
<input class='enteryouremail' name='email' onblur='if (this.value == "") {this.value = "Enter your email....";}' onfocus='if (this.value == "Enter your email....") {this.value = "";}' type='text' value='Enter your email....'/>
<input name='uri' type='hidden' value='leetbloggers'/>
<input name='loc' type='hidden' value='en_US'/>
<input class='submitbutton' type='submit' value='Subscribe'/></form>
</div>
</div>
<div class='box-right'>
<a href='http://www.leetblogger.com' rel='nofollow' title='Leet Blogger'><img alt='Leet Blogger' height='250' src='http://itmasti.com/wp-content/uploads/2014/04/350x250.png' width='300'/></a>
</div>
<div style='clear: both;'/>
</div>
</b:if>
Replace "leetbloggers" in the code and replace the code Email Subscribe.
http://www.leetblogger.com with your link
http://itmasti.com/wp-content/uploads/2014/04/350x250.png with your image
How to Install the Latest Alexa Widget 2014
As we all know that Alexa now has changed its web interface. Alexa is now more present Pro features to its users. With each passing Alexa web interface, there are features that are hard to find by the site owner or the manager of the blog is the Alexa widget code to be stored in the blog.
From the first look at the new look Alexa, I tried to look for this one feature that I can find the old view Alexa. All the menus and page I try to explore but still did not find a page that describes how to install the Alexa widget or the page that displays the Alexa widget code to be installed on the blog. Until today I finally managed to find a way to install the Alexa widget on this new display.
Well for those of you who have made a blog and want to keep the Alexa widget on the blog, please follow the way below.
Have you entered the Alexa web or please access the following link: http://www.alexa.com/
Then click the Support as shown below.
 Once open its Support page, just typing the keyword "Alexa widget" on the search box as shown below and then click enter.


» DO NOT FORGET TO LIKE N Yeach comments ...
From the first look at the new look Alexa, I tried to look for this one feature that I can find the old view Alexa. All the menus and page I try to explore but still did not find a page that describes how to install the Alexa widget or the page that displays the Alexa widget code to be installed on the blog. Until today I finally managed to find a way to install the Alexa widget on this new display.
Well for those of you who have made a blog and want to keep the Alexa widget on the blog, please follow the way below.
Have you entered the Alexa web or please access the following link: http://www.alexa.com/
Then click the Support as shown below.
Click on the link Can I display my Alexa rank on my site? for information leading to the page code.
Well widget code on the page of the will be listed Alexa widget code, Copy the code into notepad. From here we have found the link to the Alexa widget code to be stored in the blog had been sought as a link
In the picture above we presented the Alexa widget code to be stored in a blog like this.
<a href="http://www.alexa.com/siteinfo/yoursite.com"><script type="text/javascript" src="http://xslt.alexa.com/site_stats/js/t/a?url=yoursite.com"></script></a>Replace yoursite.com with the name of your blog. Do not forget the code above there are 2 pieces of code yoursite.com. Because the code above there is a link, then we should also insert title tags for the link, and because of these links go to external link should use the code to open the page in a new window and also rel nofollow to make it more secure. So that would complete as below.
<a href="http://www.alexa.com/siteinfo/yoursite.com" target="_blank" title="Alexa Site Stats Widget" rel="nofollow"><script type="text/javascript" src="http://xslt.alexa.com/site_stats/js/t/a?url=yoursite.com"></script></a>Hope this helps and good luck.
» DO NOT FORGET TO LIKE N Yeach comments ...
Sliding Facebook Like Box With CSS3
I see there are many blogs that use a sliding facebook like box. Quite interesting as well as we can a little messing around with fb like box on the blog with our mouse. But I see many blogs that use a sliding fb like box using jquery to show and hide the effects of his or her sliding.

For that I am now trying to make sliding the facebook like box using only CSS3 or javascript jquery without adding to the effect of sliding it in order not to increase the burden resulting from the addition of the blog loading javascript gif as shown below.
CSS used was simple enough just to create icons and boxes where fb facebook like box as shown below. Please save the CSS code above the code ]]></b:skin> or </style>
Then, because it uses HTML5 fb like box, please add facebook javascript code just below <body>..socialbox{position:fixed;
top:10%;
right:-286px;
height:250px;
width:285px;
background:#efefef;
border:1px solid #bbb;
border-right:0;
transition:all 400ms ease-in-out;
border-radius:0 0 0 3px;
}
.fbicon-box{
width:30px;
height:35px;
position:absolute;
top:-1px;
left:-30px;
background:#405D9B;
border-radius:3px 0 0 3px;
color:#fff;
font-family:Arial;
font-size:30px;
font-weight:700;
text-align:center;
padding-top:2px;
}
.socialbox:hover{
right:0;
}
<div id='fb-root'/>Then add the following HTML code above the code </body>
<script>(function(d, s, id) {
var js, fjs = d.getElementsByTagName(s)[0];
if (d.getElementById(id)) return;
js = d.createElement(s); js.id = id;js.async=true;
js.src = "//connect.facebook.net/en_US/all.js#xfbml=1";
fjs.parentNode.insertBefore(js, fjs);
}(document, 'script', 'facebook-jssdk'));</script>
<div class="socialbox">Please replace the URL with the URL of this https://www.facebook.com/leetblogger your facebook.
<div class="fbicon-box">f</div>
<div class="fb-like-box" data-href="https://www.facebook.com/leetblogger" data-width="300" data-height="240" data-show-faces="true" data-header="false" data-stream="false" data-show-border="false"></div>
</div>
Facebook like box so that it can be run, please make sure your blog is already using jquery library like this (any version).
<script src='https://ajax.googleapis.com/ajax/libs/jquery/1.10.2/jquery.min.js' type='text/javascript'></script>Easy is not it Good luck ....
» DO NOT FORGET TO LIKE N Yeach comments ...
Best Places to put Adsense ads in Blogger
Adsense ad placement is very important and a major effect on your revenue. Get many clicks or CTR in google adsense is a dream every publiser of google adsense, but to get a click in a way that is lawful is not as easy as turning the palm of the hand. One of the things that affect large or small click on google adsense is google adsense ad placement. Well here I will give you a glimpse of tips for the best placement for google adsense ads. The best placement you can see through the image below:
Home Example 1 (Left Sidebar)

- Place an ad image size 728×90 leaderboard at the top of the article for placement targeting feature and receive a higher brand value and clickthrough rate (CTR).
- Place the wide skyscraper ad unit size of 160×600 at the bottom of the Navigation bar. Set ads to display text and image ads.
- If your Home long, it is advisable to put the unit 728×90 leaderboard ad in the middle or at the end of your page.
Example 2 (Right Sidebar)

If you have a website with right sidebar then consider how good ad placement as follows:
- Place an ad image size 728×90 leaderboard at the top of the panel above article first post for placement targeting that receive high brand value and number of click-through rate (CTR/CTR).
- Place the two pieces of the ad unit size of 300×250 medium rectangle on the right navigation bar to attract the user's eye. Set ads to display text and image ads.
Single Post/Page Articles Example 1 (Left Sidebar)

If you have a website/blog with full sidebar on the left, it can use the example above with the following caption:
- Embed the ad unit size of 336×280 large rectangle (text and images) into your article. Position on the upper left side.
- Place the ad unit size of 336×280 large rectangle between the article and the comments.
- Add wide skyscraper ad unit size of 160×600 at the bottom of the left navigation bar and set it to display text and image ads.
Example 2 (Right Sidebar)

If you have a blog with full sidebar on the right then consider the following ideas for better ad placement:
- Place two pieces of 336×280 ad unit size of the rectangle (text and images): one in the upper right content, embedded in the text and the other at the bottom of the article.
- Add ad unit size of 300×250 medium rectangle under the right navigation bar. Set ads to display text and image ads.
This trick is taken from suggestions that applied by the publisher who has successfully used the ads on their blogs handily. The next step is to bring traffic as much as possible of any good coming of it SEO, SNO, Articles, Videos and so on.

Upload files HTML, JavaScript and CSS on Google Drive
The easiest way to make File Hosting HTML, CSS and Javascript into Google Drive Who is not familiar with Google's storage service that is very helpful to the blogger. Google's blogspot users typically use the drive to store files CSS, Javascript, HTML and the like, highly qualified and hosting free is very easy to learn, its special for people who are new in the world of bloggers.

In Google drive also provides features such as application Form Online Presentation, Making Contact Form, File Upload, processing rate, Word Processing and many more, these are all provided with 15GB of free storage.
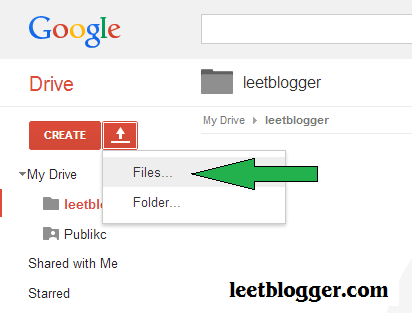
How to Upload Files to Google Drive
1. Visit https://drive.google.com2. If you want to create a new folder, please click Create Folder



Getting File Links
Links that have been copied to a notepad or less like this:https://drive.google.com/file/d/0B15D6LP8b9wYVlliMVFfemJOT1U/edit?usp=sharingNote that in the code block, to use the file replace the URL address above
https://googledrive.com/host/0B15D6LP8b9wYVlliMVFfemJOT1U
Storing files in the Template
As usual, if the file is a JavaScript then save the file above the </body> or below the </head> with a format like this:<script src="https://googledrive.com/host/0B15D6LP8b9wYVlliMVFfemJOT1U" type="text/javascript"></script>If a CSS file, save it under <head> with the format:
<link href="https://googledrive.com/host/0B15D6LP8b9wYVlliMVFfemJOT1U" rel="stylesheet" type="text/css"/>» DO NOT FORGET TO LIKE N Yeach comments ...
How to Make Demo and Download Button

How to Make Demo and Download Button The Cool - Yes that tutorial that will I give to all my friend, and download the demo button which I think is cool, is usually the key demo and is often used to download, share templates, share games, and download the demo button also made into cool stuff, ok immediately wrote see the demo below.
Cool is not it. Let's follow the tutorial to make the download button and a cool demo below.
- Sign in to Blogger
- Select Dashboard> Template> Edit HTML
- Then add the following code above ]]></b:skin>
/* Button Demo and Download by leetblogger.com
----------------------------------------------- */
.buttonx{display:inline-flex;cursor:pointer;font-size:13px;font-weight:bold;text-transform:uppercase;box-shadow:0 1px 2px rgba(0,0,0,.2);color:#FFF!important;border:2px solid #FFF!important;background-color:#0070b0!important;background:0;margin:5px 0;padding:8px 25px;text-shadow:none!important;transition:all 0s!important}
.buttonx:hover{background-color:#f78d1d!important;background:0}
.buttonx:active{position:relative;top:1px}HTML code can mate save / append mode in post HTML not compose
<div style="text-align: center;margin: 10px 0;">
<a class="buttonx" href="http://www.leetblogger.com/" target="_blank">Demo</a>
<a class="buttonx" href="http://www.leetblogger.com/" target="_blank">Download</a>
</div>
How to Make Valid XHTML Blogger Templates SEO
How to Make Valid XHTML Blogger Templates - Reduce Total Error Templates Blogspot. Perhaps many who have discussed about how to create a blog template xhtml valid or invalid html5 by reducing the number of errors in templates and widgets. Where the diminishing number of errors on the template, it will be easier for the robot browse our blog and would affect the quality of the SEO of a blog.

To check the validation of a blog template can use the tools of the W3C Markup Validation Service by visiting http://validator.w3.org/ There, we just enter the url of the blog and can determine the amount of error of our blog . Before performing the validation , it is better to use other blogs to trial, if it does not delete the widget results in the perceived error or copy all the contents of the widget to the notepad.
How to Make a Blog Templates Valid XHTML / Valid HTML5
1. Login to your Blogger > Templates > Edit HTML > Expand Widget Templates check settings2. Change 'DOCTYPE declaration , find the code below
<!DOCTYPE html PUBLIC "-//W3C//DTD XHTML 1.0 Strict//EN" "http://www.w3.org/TR/xhtml1/DTD/xhtml1-strict.dtd">remove all the above code and replace it with the following code
<html xmlns='http://www.w3.org/1999/xhtml' xmlns:b='http://www.google.com/2005/gml/b' xmlns:data='http://www.google.com/2005/gml/data' xmlns:expr='http://www.google.com/2005/gml/expr'>
<head>
<!DOCTYPE html>
<HTML>
<head>
<meta charset='utf-8'/>
after the change of code </html> to </HTML>
3. Delete the existing comment on the CSS declaration, code search dash (-----) and delete them. example:
/* ----------------------
Name: Leet Blogger Responsive Template
Date : 16 Jan 2014
Url : https://www.facebook.com/sec.researcher
-------------------------*/
Results become
/* Name: Leet Blogger Responsive Template
Date : 16 Jan 2014
Url : https://www.facebook.com/sec.researcher */
4. Remove the meta tag <b:include data='blog' name='all-head-content'/>
5. Removing the Navigation Bar default blogger, search <body> code and add the following code on top spot
<!-- <body><div></div> -->
6. Removing Icon QuickEdit or images screwdriver, look for the code <b:include name='quickedit'/>
if you have found clear all, do not forget if you later add a new widget to remove the code again.
7. Removing Post icon, locate the following code
<span class='post-icons'>
<!-- email post links -->
<b:if cond='data:post.emailPostUrl'>
<span class='item-action'>
<a expr:href='data:post.emailPostUrl' expr:title='data:top.emailPostMsg'>
<img alt='' class='icon-action' height='13' src='http://img1.blogblog.com/img/icon18_email.gif' width='18'/>
</a>
</span>
</b:if>
<!-- quickedit pencil -->
<b:include data='post' name='postQuickEdit'/>
</span> <div class='post-share-buttons'>
<b:include data='post' name='shareButtons'/>
</div> </div>
Remove and replace with the following code
<span class='post-icons'>
<!-- email post links -->
<b:if cond='data:post.emailPostUrl'>
</b:if>
</span>
</div>
8. adding types type = "text/javascript" on all JavaScript code and type type = "text/css" for all existing css, either in templates, post or in a widget. example:
<script src="https://leetblogger.googlecode.com/files/code.js"></script>
<script src="https://leetblogger.googlecode.com/files/coba.css"></script>
Change it to
<script type="text/javascript" src="https://leetblogger.googlecode.com/files/code.js"></script>
<script type="text/css" src="https://leetblogger.googlecode.com/files/coba.css"></script>
9. Hiding page navigation on the main page, look for the code <b:include name='nextprev'/> replace with the following code
<b:if cond='data:blog.homepageUrl != data:blog.url'>
<!-- navigation -->
<b:include name='nextprev'/>
</b:if>
10. Adding Alt attributes on all images, examples
<img height='75' src='https://blogger.googleusercontent.com/img/b/R29vZ2xl/AVvXsEjpOjFdZ-NLj0YZbVtJIJozDwGKIitbZ8uUgysBxa-b-iEsh8RCrV4AMMWCaxLnSeqPc0aY641JOCsZelzn2nPjp28mPYQaOeKV_1bI-zUIPWkhRJKqUNE4EVRpYKlX73aRIRdN8NVgfis/s1600/logo.png' width='75'/>
Change becomes as below
<img alt='no image' height='75' src='https://blogger.googleusercontent.com/img/b/R29vZ2xl/AVvXsEjpOjFdZ-NLj0YZbVtJIJozDwGKIitbZ8uUgysBxa-b-iEsh8RCrV4AMMWCaxLnSeqPc0aY641JOCsZelzn2nPjp28mPYQaOeKV_1bI-zUIPWkhRJKqUNE4EVRpYKlX73aRIRdN8NVgfis/s1600/logo.png' width='75'/>
11. Remove all the meta tags resulting Error in blog template. Use meta tags follows Valid HTML 5
<b:if cond=’data:blog.pageType == "item"’>
<title><data:blog.pageName/> | <data:blog.title/></title>
<b:else/>
<title><data:blog.pageTitle/></title>
</b:if>
<b:if cond=’data:blog.url == data:blog.homepageUrl’>
<meta content='Your Blog Description' name='description'/>
<meta content=’Keywords of your blog’ name=’keywords’/></b:if>
<link href=’http://leetblogger.com/atom.xml’ rel=’alternate’ title=’Atom’ type=’application/atom+xml’/>
<link href=’http://leetblogger.com/feeds/posts/default’ rel=’alternate’ title=’RSS Feeds’ type=’application/atom+xml’/>
<link href=’http://www.blogger.com/openid-server.g’ rel=’openid.server’/>
<link href=’http://leetblogger.com/favicon.ico’ rel=’icon’ type=’image/x-icon’/>
<meta content=’verification code from google webmaster’ name=’google-site-verification’/>
<meta content=’alexa verification code’ name=’alexaVerifyID’/>
<meta content=’verification code from bing’ name=’msvalidate.01′/>
<meta content=’your Name’ name=’Author’/>
12. Addressing error css templates bundle, remove code <b:skin><![CDATA[
replace with the following code
<link type='text/css' rel='stylesheet' href='//www.blogger.com/static/v1/widgets/3950009988-widget_css_bundle.css' /> <style type="text/css"> <!-- /*<b:skin><![CDATA[*/]] <style>
13. Hide widgets on the main page.
<b:if cond='data:blog.homepageUrl != data:blog.url'>
The hidden widget you Want
</b:if>
14. Put it under the following script just below <head>
<!--[if IE]><script type='text/javascript' src='http://html5shiv.googlecode.com/svn/trunk/html5.js'></script><![endif]-->
15. At the time of posting pictures remove attributes Anchor='1' and border='0' alt dressing and add the title attribute. The following example is a standard image format blogspot
<div class="separator" style="clear: both; text-align: center;">
<a href="https://blogger.googleusercontent.com/img/b/R29vZ2xl/AVvXsEjpOjFdZ-NLj0YZbVtJIJozDwGKIitbZ8uUgysBxa-b-iEsh8RCrV4AMMWCaxLnSeqPc0aY641JOCsZelzn2nPjp28mPYQaOeKV_1bI-zUIPWkhRJKqUNE4EVRpYKlX73aRIRdN8NVgfis/s1600/logo.png" imageanchor="1" style="margin-left: 1em; margin-right: 1em;"><img border="0" src="https://blogger.googleusercontent.com/img/b/R29vZ2xl/AVvXsEjpOjFdZ-NLj0YZbVtJIJozDwGKIitbZ8uUgysBxa-b-iEsh8RCrV4AMMWCaxLnSeqPc0aY641JOCsZelzn2nPjp28mPYQaOeKV_1bI-zUIPWkhRJKqUNE4EVRpYKlX73aRIRdN8NVgfis/s1600/logo.png" /></a></div>
Change it to
<div class="separator" style="clear: both; text-align: center;">
<a href="https://blogger.googleusercontent.com/img/b/R29vZ2xl/AVvXsEjpOjFdZ-NLj0YZbVtJIJozDwGKIitbZ8uUgysBxa-b-iEsh8RCrV4AMMWCaxLnSeqPc0aY641JOCsZelzn2nPjp28mPYQaOeKV_1bI-zUIPWkhRJKqUNE4EVRpYKlX73aRIRdN8NVgfis/s1600/logo.png" style="margin-left: 1em; margin-right: 1em;"><img alt="Leet Blogger" title="Leet Blogger" src="https://blogger.googleusercontent.com/img/b/R29vZ2xl/AVvXsEjpOjFdZ-NLj0YZbVtJIJozDwGKIitbZ8uUgysBxa-b-iEsh8RCrV4AMMWCaxLnSeqPc0aY641JOCsZelzn2nPjp28mPYQaOeKV_1bI-zUIPWkhRJKqUNE4EVRpYKlX73aRIRdN8NVgfis/s1600/logo.png" /></a></div>
16. Never use tag <center> to make writing or drawing centered, use the following code if you do not want to result in either an html error in the post or in the html widget.
<div style="text-align: center;">Fill Widget</div>
If you really like this Post comment below! Thanks....
10 Differences Between Author and Admin Blog
10 Differences Between Author and Admin Blog - In the past few days, I have explained about the author and the blog admin I explained in two different articles. And in this article, I will explain the difference between them. The explanation in this article refers to two previous articles and not the difference in general, because when viewed in general, between the author and the blog admin is the same and if I set it apart in terms of invites or invite people to be a writer or a blog admin

Please read the previous article:
How to Invite People to Become Writer Blog
How to Invite People to Become Admin Blog
10 Differences Between Author and Admin Blog
| Category | Author Blog | Admin Blog |
|---|---|---|
| Writing and editing blog articles |
√
|
√
|
| Publish entries / articles using SMS / MMS |
√
|
√
|
| Publish entries / articles using email |
√
|
√
|
| Setting the display blog |
X
|
√
|
| Set the permissions as the author of the blog |
√
|
√
|
| Set the permissions as the admin blog |
X
|
√
|
| Create a blog with the same account |
X
|
X
|
| Organize and edit the blog template |
X
|
√
|
| Changing the blog template |
X
|
√
|
| Deleting blog |
X
|
√
|
The 10 differences between the author and the blog admin look above, there is one of the most important conclusion to note is, if you want to ask or invite someone else, a friend, or a friend, make sure that they are the ones who can really be trusted, because if not then you create a blog, you wake up in such a way that will expire immediately if the blog is deleted intentionally and without your knowledge because the act of admin - admin blogs that have these laws. And my advice, make them better as a blog author alone :)
As a side note: in my Blogger account, there are 7 blogs that make me admin blog blogger friends because they trusted me to edit or replace their blog template. Thank you for the confidence of friends during this
Okay, that's the 10 differences between the author and the blog admin category if you invite people or friends as a writer and your blog admin. If there are less than the differences that I wrote above, please add your own. Hopefully useful,
Also Read:
How to Invite People to Become Writer Blog
How to Invite People to Become Admin Blog
» DO NOT FORGET TO LIKE N Yeach comments ...
Also Read:
How to Invite People to Become Writer Blog
How to Invite People to Become Admin Blog
» DO NOT FORGET TO LIKE N Yeach comments ...
How to Invite People to Become Admin Blog
How to Invite People to Become Blog Admin - If the previous article I have explained about how to invite people into the blog authors and before continuing to read this article I hope you've read the article Because this article is a continuation of the article and the previous article described only Briefly

Once you follow the way to invite people into the blog authors in previous articles , please fill out the following steps in order to blog writers that could be a blog you admin
How to Invite People to Become Writer Blog Please go to Dashbord >> Settings >> Basic.

After this click on +Add author and add that perosn email who you want to admin on your blogger, an invitation email gone on his email for verification.
After the invitation email sent, and your friend also have clicked the link the link provided by the blogger then automatically they will be brought into your blog dashboard and can instantly post his writings.
After that you have to change permision Author to Admin.
Its done I hope this article usefull for readers, Still Confusion? just comment blow.
Also Read:
» DO NOT FORGET TO LIKE N Yeach comments ...
How to Invite People to Become Writer Blog
How to Invite People to Become Writer Blog - There is no time to take care or fill a blog with articles ? Why not invite people to become a blog writer you? By invite or invite people into a blog writer , it will provide the effectiveness of time that could be used to take care of other blogs. However, to invite people or friends to make himself as the author of the blog we are, is not easy, takes a few terms or conditions agreed upon by both parties, especially for the writer of the blog, there should be rewards or benefits granted. In addition, there must be procedures that need to be done first, before inviting others to be part of our blog

How to Invite People to Become Writer Blog
Please login first to account Bloggers You
Inside the Blogger Dashboard, select the menu Settings >> Basic
Go to the dashboard you want to add a blog author
A look at the blog author. enter the email address of the person who wants to be a writer (the owner of the email which should have been invited to use blogger).
Click the Invite Author
The next step is to ask the owner of the email address to open the email because there is a new email sent by bloggers for verification. 'm also the owner of the email to log in its bloggers.
Open the email and click the Accept Invitation
Your friend has become the author of your blog and can contribute articles. then you can determine whether your friend will be the admin or just a regular writer. Finally on the dashboard of your blog there are 2 authors
Also Read:
» DO NOT FORGET TO LIKE N Yeach comments ...
How to Fix Crawl Errors in Google Webmaster Tools
How to resolve the error using webmastr crawl tool, one way optimization blog is a way to remove the error happened when Google crawl crawling on our blog. The goal for the crawling process to be smooth, because the error crawl ( crawl errors ) would impede and interfere with the process of the search engines crawl and index your blog.

Actually causes vary and one of the most common causes is the user deleting blogs and articles that have been published already indexed by google. When the Google Search Engine to index link the error and then someone clicks on the link will display a page that read Crawl Error 404 Not Found, meaning that the requested URL could not be addressed or not found.
Sometimes, too crawl error occurred in the comment box when there are bloggers who leave a link in the blog article and the article was removed by its owner so that the warning appears Url Not Found ( not found).
HOW TO OVERCOME CRAWL AND ERROR ON BLOG
1. Login to Google Webmaster Tools Dashboard page.
2. If you have more than one blog, select the blog you want to check ( check )
3. Then on the left sidebar, click Crawk >> ERROR crawl
4. Check all crawl errors
5. Click Mark as fixed
6. click Ok

There is written: This error will not be included again (but probably will come back if the problem is not solved )
So if the next time you check again but still left some crawl errors that can not be repaired. Then do step one (1) to three (3 ) above, so that steps to
4. Click on Not Found.
5. You will be taken to the Crawl Errors page. This page will be shown in the URL Not Found. Copy the url - url.
6. Then go to the Google Index >> and then click Create New Removal Request
7. Paste the copied URL Not found earlier, then click Continue
8. Then will come the 3 options in the delete URL
>> URLs will be removed from Google's search results and cache
>> URLs will be removed from the cache only
>> URLs will be removed from the Google directory

9. Click Send Inquiry
Removal process URL Not Found This requires quite a long time. I used to use the first way, but because there is still a stubborn errors, I apply both ways but still do not know the distance of time. Depending on how diligent Google crawl your blog. Thus knowing how to crawl error on the blog. Hope can be resolved and the process of crawling on your blog more smoothly and help position your blog on Google.
» DO NOT FORGET TO LIKE N Yeach comments...
Create Sitemap Table of Contents in Blogger Page
How do I create a blog sitemap or table of contents page article on bloggers ? there are still many bloggers who still do not understand how to create a table of contents page in his blog . For that let us learn to create content/sitemap and put it on your blog page .
Free tutorials to create a sitemap/table of contents of this blogger I created based on that I apply in this blog . For that I give this tutorial so that you can also apply it on your blog . For a demo page that we will create a sitemap, sitemap page please look at this blog .
Every blog should have the article or page content that is often referred to sitemap blog. because through the table of contents will display the entire contents of the content/article on our blog . So the sitemap page visited blogs , readers who visit our blog will be easy to find and select all of the content or the articles they are looking for . So that readers will be very pleased with the ease that you provided through your blog content .

I create a sitemap/table of contents page of your blog.
1. Login to Blogger Dashboard.
2. Select the Pages menu tab/page

Creating Sitemap/Table of Contents Pages in Blogger Page

4. Give Title Page/Page you. example page title: "Sitemap Blog".
5. On page posts, Compose into HTML.
Creating Sitemap / Table of Contents Pages in Blogger Page

<style type="text/css">
#toc{
width:99%;
margin:5px auto;
border:1px solid #2D96DF;
-webkit-box-shadow:4px 4px 8px 2px rgba(0,0,0, 0.2);
-moz-box-shadow:4px 4px 8px 2px rgba(0,0,0, 0.2);
box-shadow:4px 4px 8px 2px rgba(0,0,0, 0.2);
}
.labl{
color:#FF5F00;
font-weight:bold;
margin:0 -5px;
padding:1px 0 2px 11px;
background:-moz-linear-gradient(right,#C2EAFE 0%,#055A85 40%);
background:-webkit-gradient(linear,left 10,right 80,color-stop(0.20,#055A85),color-stop(1,#C2EAFE));
border:1px solid #2D96DF;
border-radius:4px;-moz-border-radius:4px;
-webkit-border-radius:4px;box-shadow:3px 3px 1px #bbb;
-moz-box-shadow:3px 3px 1px #bbb;-webkit-box-shadow:3px 3px 1px #bbb;display:block;
}
.labl a{
color:#fff;
}
.labl:first-letter{t
ext-transform:uppercase;
}
.new{
color:#FF5F00;
font-weight:bold;
font-style:italic;
}
.postname{
font-weight:normal;
background:-moz-linear-gradient(right,#C2EAFE 0%,#fff 40%);
background:-webkit-gradient(linear,left 80,right 10,color-stop(0.60,#fff),color-stop(1,#C2EAFE));
}
.postname li{
border-bottom: #ddd 1px dotted;
margin-right:5px
}
</style>
<div id="toc">
<script src="https://googledrive.com/host/0ByNodV_m9cVLR0pmWFgwZ1NmdW8/" type="text/javascript"></script>
<script src="http://www.leetblogger.com/feeds/posts/default?max-results=9999&alt=json-in-script&callback=loadtoc">
</script></div>6. Then click Publish to publish your page.


» DO NOT FORGET TO LIKE N Yeach comments ...
11 Reasons That Cause Google Deleted Blog

Blogger blog platform is one of Google's flagship products are very popular and most widely used as a medium for publishing to the Internet. The reason, in addition to free, its use is also very easy. Yet, despite it all, I also uphold the quality, comfort and safety for its users. If a user violates the Content Policy, then google will take tough measures that led to the elimination of the blog.
Why their blog deleted? That's because they publish content that does not conform with the policy contains specified by google. Well, in this post, we will discuss and understand the things that are contrary to the policy content and blogs to stay safe to avoid penalties from Google.
1. Adult Content
Actually google gives users the freedom to bloggers to publish adult content (sexual activity). However, with a note to alert the blog as "Adult Content". If this mark is not given, then the google blog will give punishment deletion permanently.
2. Hate Speech
Never publish content exceeds reasonable limits and encourage hatred. Such as promoting hatred against tribe, religion, race, gender, ethnicity, age, status.
3. Child Safety
According to Google, they will not tolerate a blog that endanger the safety of the children. For example, child pornography and pedophilia (sexual attraction to the promotion of children). Both of these are clearly contrary to the policy of google.
4. Violence
Article should not be a threat of death or the safety of someone/group have been criticized by parties other than Google, is also a violation of the criminal law act or articles that encourage someone to commit acts of violence and racism.
5. Crude Content
One who violates Google policy is rude content. Such as pictures, video or graphic content that clearly shows a sharp weapon wounds/rifle or show someone brutality that resulted in accidents and even loss of life.
6. Illegal Activity
Posted a article which includes all sorts of illegal activities, such as pushing or invite someone to use drugs or alcohol. In this case and with regard to child sexual abuse, the parties insists google will give the action they should do even report it to the authorities.
7. Copyrighted materials
Anyone will not like if their work copied by others without the consent of the publisher/maker. In this case Google has a very effective system to handle. Copied copyrighted content will result in a very low rank, suspension of Google Adsense and Elimination blog from search engines. Well, if you find your work material copied by other blogs, do not worry because you can report it via the Report of Alleged Copyright Infringement Blogger supported by the DMCA (Digital Millennium Copyright Act)
8. Privacy Violations
Do not article containing confidential information a person. For example, credit card numbers, telephone, personal contacts, as well as other confidential information that is contrary to Google's privacy policy.
9. Spam
Spam is an activity that is not liked by Google. Some of them are kind of spam unnatural backlinks, content impersonation and many other types of spam that should be avoided by a blogger.
10. Impersonation
Impersonating someone with the purpose of misleading, pretending to be someone else, to confuse readers and other purposes is a criminal act which case you should avoid.
11. Malware
Insert malware or viruses into the blog is not a commendable act and not at all appreciated. The risk of this action is permanently banned by Google. Such things that you must understand and know about the content of the above policy and security sake of your blog, do not ever violate what has been set by Google (Blogger).
» DO NOT FORGET TO LIKE N Yeach comments ...
How to Subscribe/Get Latest Articles of Blog

The foregoing is most likely influenced by several factors, one of them due to a lack of understanding of how to subscribe or get the latest articles. Well, for that purpose I created this article in order for those who want to get an update article that was updated over the blogs/websites that they love no exception Lost-sector.net they can get.
How to Subscribe Latest Articles
Almost all the blog/website provides a means to make it easier for the visitors to get the latest articles by providing a subscription form, be it a standard form provided by Google FeedBurner and that has been modified in such a way so as to appear more attractive. Well, for those of you who want to get the latest articles from the web/blog that becomes your favorite, it helps you pay attention to the steps below:

3. If the button "Submit" you've been hit, it will display a popup or new window. Enter the verification word and proceed by pressing the " Complete Subscription Request "

5. If it is clicked, then sending notifications of the latest articles to your email inbox is already active.
Hope it helps and hopefully useful. Thank you and best regards Leet blogger ...!
How to Change Blogger Template

Free how to change the blog template (change the look) is of course for new bloggers who do not know how to change the look of the blog it. However, the old blogger can "peek" of his, who knew there was "nothing new" in this blogging basic tutorial ^ _ ^. Referred to change the blog template here does not replace the supplied template blogspot, but replace it with a template downloaded from provider sites blog templates like:
BTemplates4u
Mastemplate
AllBlog Tools
Cool B Theme
1. How To Change Template Blog:
- Download The template. Select the template that clean, fast loading, and SEO Friendly. Read the review template (if any). You can test all SEO's demo template in Chkme. Test loading at GTMetrix.
- You have downloaded a ZIP or RAR file, extract the file (how: right click> exctract to [filename] ) so that it becomes an extension of XML files . If it becomes more than one file, "secure" with extension XML. Another file is usually a "readme" or the installation guide and links.
- Log in to Blogger. www.blogger.com Type in the address bar of your browser.
- Click the Templates in the lower left Dashborad Blog.

- Click the Backup/Restore at the top right of the Dashboard Blog.

- Click Choose File/Select File. Click the XML extension file that was downloaded/extracted.

- Click Upload, Wait for it to finish.

- Congratulations, your blog's look has changed!
2. Changing the Blog Template:
- Changing template has not been completely finished after earlier Steps. There are still some things to consider, including:
- Changing Logo. If in your new template logo image. Replace with your version of the logo in the Lay-out menu (Layout)> Header. Sometimes there is a logo in the template (HTML code), find the file and replace it with the URL of your logo.
- Changing the menu. Change the names of the menu and its link to the menu you want. The trick, click Template> Edit HTML> find the menu (CTRL + F) and Replace/Change.
- Sometimes there is a template that uses the HOME menu link template designer. Check the menu and the home link in the template. If the link like this, <a href='/'> HOME </a>, do not have to be changed, it is correct. If not so, change into so ^_^
- You can change the font color and other colors by changing the color of the existing code. View> HTML color code .
- Check link RSS Feed/Subscribe, whether empty or use FeedBurner another ID. Replace with your FeedBurner ID.
- Check also the SEARCH link (if any). Navigate searchnya link to your blog (if there is another blog name, change the name of your blog). For example, there is code like this: <form id = "searchform" action = "http://leetblogger.com / search "... /> , then replace with the name of your blog.
- Check the footer link to the " Copyright (c) Year BLOG NAME. All right reserved ", if it leads to your blog name or to the name of another blog. If the display name of the other blogs, such as template name, change the name of your blog. Generally the heck has led to the name of your blog. But there is also the name of the template.
» DO NOT FORGET TO LIKE N Yeach comments ...
Subscribe to:
Posts
(
Atom
)


